Learn how to check for conflicting software in Google Chrome to troubleshoot issues and resolve conflicts. Follow these steps to access Chrome settings, identify potential conflicts, and take necessary actions to ensure smooth browsing experience.

Introduction: Troubleshooting Chrome Freezing Issues
The latest Windows update has brought exciting new features and enhancements to your computer. However, you may encounter unexpected issues such as Google Chrome freezing or becoming unresponsive after the update. This article aims to provide you with a comprehensive guide to troubleshooting and resolving these Chrome freezing issues on your Windows PC.
1: Update Google Chrome
The first step in addressing Chrome freezing problems is to ensure you are using the latest version of the browser. Outdated software can be prone to compatibility issues with the updated operating system. To update Chrome, simply open the browser, click on the three-dot menu in the top right corner, go to Help, and select About Google Chrome. If an update is available, it will automatically download and install.
How To Update Google Chrome?
- Launch Google Chrome: Open the Chrome browser on your computer by double-clicking the Chrome icon on your desktop or selecting it from your Start menu (if you have it pinned there).
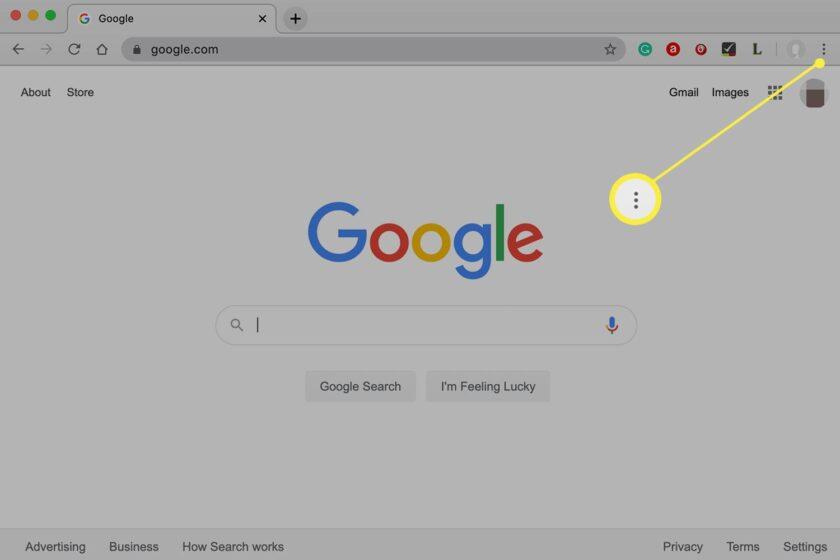
- Access the Chrome menu: Once Chrome is open, look at the top-right corner of the browser window. You’ll see three vertical dots stacked on top of each other. Click on these dots to open the Chrome menu.
- Navigate to the “Help” section: In the Chrome menu, hover your mouse over the “Help” option. A submenu will appear with additional options.
- Check for updates: From the submenu, click on the “About Google Chrome” option. A new tab will open, displaying information about your current Chrome version and whether an update is available.
- Update Chrome: Chrome will automatically check for updates. If an update is available, it will begin downloading and installing it. The process may take a few minutes, depending on your internet connection speed and the size of the update.
- Relaunch Chrome: After the update is installed, Chrome will prompt you to relaunch the browser to apply the changes. Click on the “Relaunch” button, or close and reopen Chrome manually.
- Verify the update: Once Chrome relaunches, you can confirm that the update was successful by repeating steps 2 and 3. When you hover over the “Help” option in the Chrome menu and click on “About Google Chrome” again, you should see the updated version number.
2: Clear Browsing Data
Excessive browsing data can accumulate over time, causing Chrome to become sluggish and unresponsive. Clearing your browsing data can help improve performance and resolve freezing issues. In Chrome, click on the three-dot menu, go to More tools, and select Clear browsing data. Choose a time range and select the types of data you want to delete, such as browsing history, cookies, and cached images. Click on Clear data to confirm.
How To Clear Browsing Data in Chrome
- Open Chrome: Launch the Google Chrome browser on your computer by double-clicking the Chrome icon on your desktop or selecting it from your Start menu (if you have it pinned there).
- Access the Chrome menu: Look at the top-right corner of the browser window. You’ll see three vertical dots stacked on top of each other. Click on these dots to open the Chrome menu.
- Go to Settings: From the Chrome menu, hover your mouse over the “More tools” option. A submenu will appear with additional options. From the submenu, click on “Clear browsing data.”
- Customize the data to be cleared: In the Clear browsing data window that appears, you have the option to customize the data you want to delete. You can choose a time range for which you want to clear the data by clicking on the drop-down menu next to “Time range.” The options include “Last hour,” “Last 24 hours,” “Last 7 days,” “Last 4 weeks,” and “All time.” Alternatively, you can select “All time” to clear all browsing data.
- Select the types of data to clear: Underneath the time range, you’ll see a list of different types of browsing data you can choose to clear. The options typically include “Browsing history,” “Cookies and other site data,” “Cached images and files,” “Download history,” “Passwords,” and more. Check the boxes next to the types of data you want to delete.
- Clear the browsing data: Once you have selected the desired time range and data types, click on the “Clear data” button. Chrome will then begin clearing the selected browsing data.
- Wait for the process to complete: The time it takes to clear the browsing data depends on the amount of data you have accumulated. Chrome will display a progress bar indicating the status of the clearing process.
- Confirmation: After the process is complete, a confirmation message will appear, indicating that the browsing data has been successfully cleared.
3: Disable Extensions
Extensions are additional software components that enhance Chrome’s functionality. However, incompatible or poorly designed extensions can conflict with Chrome and lead to freezing problems. To identify if any specific extension is causing the freezing, disable them one by one. Go to the three-dot menu, select More tools, and choose Extensions. Disable the extensions and check if the freezing issue persists.
How to disable Extensions in Chrome
- Open Chrome: Launch the Google Chrome browser on your computer by double-clicking the Chrome icon on your desktop or selecting it from your Start menu (if you have it pinned there).
- Access the Chrome menu: Look at the top-right corner of the browser window. You’ll see three vertical dots stacked on top of each other. Click on these dots to open the Chrome menu.
- Go to Extensions: From the Chrome menu, hover your mouse over the “More tools” option. A submenu will appear with additional options. From the submenu, click on “Extensions.”
- View installed extensions: The Extensions page will open, displaying a list of all the extensions installed in Chrome. You’ll see a toggle switch next to each extension, indicating whether it is enabled or disabled.
- Disable an extension: To disable a specific extension, locate it in the list and toggle off the switch next to it. The extension will be disabled, and its functionality will be turned off in Chrome.
- Verify the extension is disabled: Once you have disabled an extension, you can confirm that it is no longer active. The toggle switch next to the extension should be in the “off” position, and the extension’s features or functionalities should no longer be visible or accessible in Chrome.
- Optional: Enable or remove extensions: If you decide to re-enable an extension, you can simply toggle on the switch next to it on the Extensions page. If you wish to remove an extension completely from Chrome, click on the “Remove” button located under the extension’s details on the Extensions page.
4: Reset Chrome Settings
Resetting Chrome to its default settings can help resolve various issues, including freezing problems. Open Chrome’s settings, scroll down, and click on Advanced. Under the “Reset and clean up” section, select Restore settings to their original defaults. Confirm the reset and restart Chrome. Note that this action will remove your browsing history, cookies, and extensions, so make sure to back up any important data beforehand.
How to reset Chrome settings
- Open Chrome: Launch the Google Chrome browser on your computer by double-clicking the Chrome icon on your desktop or selecting it from your Start menu (if you have it pinned there).
- Access the Chrome menu: Look at the top-right corner of the browser window. You’ll see three vertical dots stacked on top of each other. Click on these dots to open the Chrome menu.
- Go to Settings: From the Chrome menu, click on “Settings.” This will open the Chrome settings page in a new tab.
- Scroll to the bottom: Scroll down the settings page until you reach the bottom.
- Advanced settings: Click on the “Advanced” option to expand the advanced settings section.
- Find the “Reset and clean up” section: Scroll down further until you locate the “Reset and clean up” section.
- Reset settings to their original defaults: Under the “Reset and clean up” section, click on the “Restore settings to their original defaults” option. A confirmation dialog box will appear.
- Confirm the reset: In the confirmation dialog box, you’ll see a summary of the settings that will be restored to their original defaults. If you’re sure you want to proceed, click on the “Reset settings” button.
- Wait for the reset: Chrome will then begin the process of resetting the settings. This may take a few moments to complete.
- Restart Chrome: After the reset process is finished, Chrome will automatically restart.
- Verify the reset: Once Chrome relaunches, you can check if the settings have been reset by going back to the Chrome menu and clicking on “Settings.” You should see that the settings have returned to their default values.
5: Disable Hardware Acceleration
Hardware acceleration is a feature that utilizes your computer’s GPU to boost Chrome’s performance. However, in some cases, it can lead to freezing or display issues. Disabling hardware acceleration in Chrome can help alleviate these problems. Go to Chrome’s settings, scroll down, and click on Advanced. Under the “System” section, toggle off the option for “Use hardware acceleration when available.”
How to Disable Hardware Acceleration in Chrome?
- Open Chrome: Launch the Google Chrome browser on your computer by double-clicking the Chrome icon on your desktop or selecting it from your Start menu (if you have it pinned there).
- Access the Chrome menu: Look at the top-right corner of the browser window. You’ll see three vertical dots stacked on top of each other. Click on these dots to open the Chrome menu.
- Go to Settings: From the Chrome menu, click on “Settings.” This will open the Chrome settings page in a new tab.
- Scroll to the bottom: Scroll down the settings page until you reach the bottom.
- Advanced settings: Click on the “Advanced” option to expand the advanced settings section.
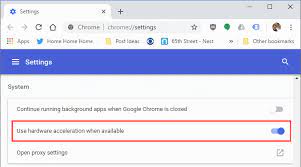
- Find the “System” section: Scroll down further until you locate the “System” section.
- Disable hardware acceleration: Under the “System” section, you’ll find an option labeled “Use hardware acceleration when available.” By default, this option is enabled. To disable hardware acceleration, toggle off the switch next to this option.
- Relaunch Chrome: After disabling hardware acceleration, you’ll see a prompt at the bottom of the settings page asking you to relaunch Chrome to apply the changes. Click on the “Relaunch” button, or close and reopen Chrome manually.
- Verify hardware acceleration is disabled: Once Chrome relaunches, you can confirm that hardware acceleration has been disabled by going back to the Chrome menu, selecting “Settings,” scrolling down to the “System” section, and ensuring that the “Use hardware acceleration when available” option is still toggled off.
6: Check for Conflicting Software
Certain software programs, especially antivirus or firewall applications, can interfere with Chrome’s normal functioning. Temporarily disable any security software you have installed and check if the freezing issue persists. If the problem goes away, consider adjusting the settings of your security software to allow Chrome to run smoothly.
How to Check for Conflicting Software in Chrome?
- Open Chrome: Launch the Google Chrome browser on your computer by double-clicking the Chrome icon on your desktop or selecting it from your Start menu (if you have it pinned there).
- Access the Chrome menu: Look at the top-right corner of the browser window. You’ll see three vertical dots stacked on top of each other. Click on these dots to open the Chrome menu.
- Go to Settings: From the Chrome menu, click on “Settings.” This will open the Chrome settings page in a new tab.
- Scroll to the bottom: Scroll down the settings page until you reach the bottom.
- Advanced settings: Click on the “Advanced” option to expand the advanced settings section.
- Find the “System” section: Scroll down further until you locate the “System” section.
- Check for conflicting software: Under the “System” section, you’ll find an option labeled “Reset settings.” Click on the “Open your computer’s proxy settings” link next to it.
- Open Proxy Settings: This will open the Proxy settings page in your operating system’s control panel or settings.
- Check for proxy or VPN software: Look for any installed proxy or VPN software that might be conflicting with Chrome. Disable or uninstall any proxy or VPN software temporarily.
- Restart Chrome: After disabling or uninstalling the conflicting software, close and reopen Google Chrome.
- Test for conflicts: Use Chrome as you normally would and see if the issues or conflicts you were experiencing have been resolved. If the problems are resolved, it’s likely that the conflicting software was the cause.
- Re-enable or reinstall software: If you find that the issues are resolved and the conflicting software was the cause, you can choose to re-enable or reinstall the software. However, be mindful that conflicts may reoccur, and you may need to troubleshoot further or seek alternatives to the conflicting software.
Conclusion:
Experiencing Chrome freezing or becoming unresponsive after a Windows update can be frustrating. However, by following the troubleshooting steps outlined in this comprehensive guide, you should be able to resolve the issue and enjoy a smooth browsing experience once again.
Remember to keep your browser and operating system up to date, clear browsing data regularly, disable conflicting extensions, reset Chrome settings if necessary, disable hardware acceleration, and check for conflicting software. If the problem persists, don’t hesitate to seek further assistance from Google Chrome support or Microsoft support.
Also Check: How To Activate Grifols Plasma Loyalty Card
Follow us or bookmark us for more Technology Business Latest Pictures Entertainment News Celeb Bio box office collection report celebrities trailers and promos